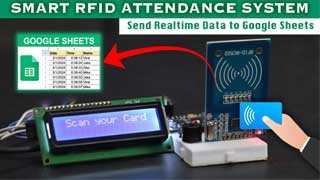
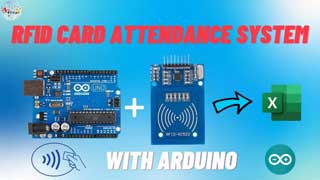
To create an RFID attendance system with NodeMCU and Google Spreadsheet captures and stores attendance data in real- time by scanning RFID tags.

#include <Arduino.h>
#include <ESP8266WiFi.h>
#include <SPI.h>
#include <MFRC522.h>
#include <HTTPSRedirect.h>

#include<Wire.h>
#include<LiquidCrystal_I2C.h>
LiquidCrystal_I2C lcd(0x27, 16, 2);
//---------------------------------------------------------------------------------------------------------
// Enter Google Script Deployment ID:
// const char *GScriptId = "AKfycbxVmV3HB_xUmex03LGeYyhF7shUhjXCzB8C71edjjP2hKWAIEetH6jnWZVrQ-X15CwmWg";
// const char *GScriptId = "AKfycbzxhp1rtAKXeGzb-wR2O_eZIRcw5DdMVlDIlGd7uN7QOj7PUh1_qd76nhL0JjeiAjd4Ow";
// const char *GScriptId = "AKfycbxXplpr2omkpTG4YZKw6RxjFDFV_ZbMAKbTIp_OdM4N8kceYNxcqHDN7uDYp_kyIk7n7Q";
// const char *GScriptId = "AKfycbyJr4IgR8rxwLPdcDgBWylxkJgSDKxHAKoo80q_LwhxaqwMnmL1uzcwfvWVwPqiF5qf";
const char *GScriptId = "AKfycbw7AVuZw0G8BLcYm_2IOHg1RpCtg7jp5ac4Jc6Rc7Bv-mjgEYZibmiInSu7TPSh21p2";
//---------------------------------------------------------------------------------------------------------
// Enter network credentials:
const char* ssid     = "user’s iMac 2";
const char* password = "userimac2";
//---------------------------------------------------------------------------------------------------------
// Enter command (insert_row or append_row) and your Google Sheets sheet name (default is Sheet1):
String payload_base =  "{\"command\": \"insert_row\", \"sheet_name\": \"Sheet1\", \"values\": ";
String payload = "";
//---------------------------------------------------------------------------------------------------------
// Google Sheets setup (do not edit)
const char* host        = "script.google.com";
const int   httpsPort   = 443;
const char* fingerprint = "";
String url = String("/macros/s/") + GScriptId + "/exec";
HTTPSRedirect* client = nullptr;
//------------------------------------------------------------
// Declare variables that will be published to Google Sheets
String student_id;
//------------------------------------------------------------
int blocks[] = {4,5,6,8,9};
#define total_blocks  (sizeof(blocks) / sizeof(blocks[0]))
//------------------------------------------------------------
#define RST_PIN  0  //D3
#define SS_PIN   2  //D4
#define BUZZER   4  //D2
//------------------------------------------------------------
MFRC522 mfrc522(SS_PIN, RST_PIN);
MFRC522::MIFARE_Key key;
MFRC522::StatusCode status;
//------------------------------------------------------------
/* Be aware of Sector Trailer Blocks */
int blockNum = 2;
/* Create another array to read data from Block */
/* Legthn of buffer should be 2 Bytes more than the size of Block (16 Bytes) */
byte bufferLen = 18;
byte readBlockData[18];
//------------------------------------------------------------

/****************************************************************************************************
 * setup Function
****************************************************************************************************/
void setup() {
  //----------------------------------------------------------
  Serial.begin(9600);
  delay(10);
  Serial.println('\n');
  //----------------------------------------------------------
  SPI.begin();
  //----------------------------------------------------------
  //initialize lcd screen
  lcd.init();
  // turn on the backlight
  lcd.backlight();
  lcd.clear();
  lcd.setCursor(0,0); //col=0 row=0
  lcd.print("Connecting to");
  lcd.setCursor(0,1); //col=0 row=0
  lcd.print("WiFi...");
  //----------------------------------------------------------
  // Connect to WiFi
  WiFi.begin(ssid, password);
  Serial.print("Connecting to ");
  Serial.print(ssid); Serial.println(" ...");

  while (WiFi.status() != WL_CONNECTED) {
    delay(1000);
    Serial.print(".");
  }
  Serial.println('\n');
  Serial.println("Connection established!");
  Serial.print("IP address:\t");
  Serial.println(WiFi.localIP());
  //----------------------------------------------------------
  // Use HTTPSRedirect class to create a new TLS connection
  client = new HTTPSRedirect(httpsPort);
  client->setInsecure();
  client->setPrintResponseBody(true);
  client->setContentTypeHeader("application/json");
  //----------------------------------------------------------
  lcd.clear();
  lcd.setCursor(0,0); //col=0 row=0
  lcd.print("Connecting to");
  lcd.setCursor(0,1); //col=0 row=0
  lcd.print("Google ");
  delay(5000);
  //----------------------------------------------------------
  Serial.print("Connecting to ");
  Serial.println(host);
  //----------------------------------------------------------
  // Try to connect for a maximum of 5 times
  bool flag = false;
  for(int i=0; i<5; i++){
    int retval = client->connect(host, httpsPort);
    //*************************************************
    if (retval == 1){
      flag = true;
      String msg = "Connected. OK";
      Serial.println(msg);
      lcd.clear();
      lcd.setCursor(0,0); //col=0 row=0
      lcd.print(msg);
      delay(2000);
      break;
    }
    //*************************************************
    else
      Serial.println("Connection failed. Retrying...");
    //*************************************************
  }
  //----------------------------------------------------------
  if (!flag){
    //____________________________________________
    lcd.clear();
    lcd.setCursor(0,0); //col=0 row=0
    lcd.print("Connection fail");
    //____________________________________________
    Serial.print("Could not connect to server: ");
    Serial.println(host);
    delay(5000);
    return;
    //____________________________________________
  }
  //----------------------------------------------------------
  delete client;    // delete HTTPSRedirect object
  client = nullptr; // delete HTTPSRedirect object
  //----------------------------------------------------------
}

/****************************************************************************************************
 * loop Function
****************************************************************************************************/
void loop() {
  //----------------------------------------------------------------
  static bool flag = false;
  if (!flag){
    client = new HTTPSRedirect(httpsPort);
    client->setInsecure();
    flag = true;
    client->setPrintResponseBody(true);
    client->setContentTypeHeader("application/json");
  }
  if (client != nullptr){
    if (!client->connected())
      {client->connect(host, httpsPort);}
  }
  else{Serial.println("Error creating client object!");}
  //----------------------------------------------------------------
  lcd.clear();
  lcd.setCursor(0,0); //col=0 row=0
  lcd.print("Scan your Tag");

  /* Initialize MFRC522 Module */
  mfrc522.PCD_Init();
  /* Look for new cards */
  /* Reset the loop if no new card is present on RC522 Reader */
  if ( ! mfrc522.PICC_IsNewCardPresent()) {return;}
  /* Select one of the cards */
  if ( ! mfrc522.PICC_ReadCardSerial()) {return;}
  /* Read data from the same block */
  Serial.println();
  Serial.println(F("Reading last data from RFID..."));
  //----------------------------------------------------------------
  String values = "", data;
  /*
  //creating payload - method 1
  //----------------------------------------------------------------
  ReadDataFromBlock(blocks[0], readBlockData); //student id
  data = String((char*)readBlockData); data.trim();
  student_id = data;
  //----------------------------------------------------------------
  ReadDataFromBlock(blocks[1], readBlockData); //first name
  data = String((char*)readBlockData); data.trim();
  first_name = data;
  //----------------------------------------------------------------
  ReadDataFromBlock(blocks[2], readBlockData); //last name
  data = String((char*)readBlockData); data.trim();
  last_name = data;
  //----------------------------------------------------------------
  ReadDataFromBlock(blocks[3], readBlockData); //phone number
  data = String((char*)readBlockData); data.trim();
  phone_number = data;
  //----------------------------------------------------------------
  ReadDataFromBlock(blocks[4], readBlockData); //address
  data = String((char*)readBlockData); data.trim();
  address = data; data = "";
  //----------------------------------------------------------------
  values = "\"" + student_id + ",";
  values += first_name + ",";
  values += last_name + ",";
  values += phone_number + ",";
  values += address + "\"}";
  //----------------------------------------------------------------*/
  //creating payload - method 2 - More efficient
  for (byte i = 0; i < total_blocks; i++) {
    ReadDataFromBlock(blocks[i], readBlockData);
    //*************************************************
    if(i == 0){
      data = String((char*)readBlockData);
      data.trim();
      student_id = data;
      values = "\"" + data + ",";
    }
    //*************************************************
    else if(i == total_blocks-1){
      data = String((char*)readBlockData);
      data.trim();
      values += data + "\"}";
    }
    //*************************************************
    else{
      data = String((char*)readBlockData);
      data.trim();
      values += data + ",";
    }
  }
  //----------------------------------------------------------------
  // Create json object string to send to Google Sheets
  // values = "\"" + value0 + "," + value1 + "," + value2 + "\"}"
  payload = payload_base + values;
  //----------------------------------------------------------------
  lcd.clear();
  lcd.setCursor(0,0); //col=0 row=0
  lcd.print("Publishing Data");
  lcd.setCursor(0,1); //col=0 row=0
  lcd.print("Please Wait...");
  //----------------------------------------------------------------
  // Publish data to Google Sheets
  Serial.println("Publishing data...");
  Serial.println(payload);
  if(client->POST(url, host, payload)){
    // do stuff here if publish was successful
    lcd.clear();
    lcd.setCursor(0,0); //col=0 row=0
    lcd.print("Student ID: "+student_id);
    lcd.setCursor(0,1); //col=0 row=0
    lcd.print("Present");
  }
  //----------------------------------------------------------------
  else{
    // do stuff here if publish was not successful
    Serial.println("Error while connecting");
    lcd.clear();
    lcd.setCursor(0,0); //col=0 row=0
    lcd.print("Failed.");
    lcd.setCursor(0,1); //col=0 row=0
    lcd.print("Try Again");
  }
  //----------------------------------------------------------------
  // a delay of several seconds is required before publishing again
  delay(5000);
}


/****************************************************************************************************
 *
****************************************************************************************************/
/****************************************************************************************************
 * ReadDataFromBlock() function
 ****************************************************************************************************/
void ReadDataFromBlock(int blockNum, byte readBlockData[])
{
  //----------------------------------------------------------------------------
  /* Prepare the ksy for authentication */
  /* All keys are set to FFFFFFFFFFFFh at chip delivery from the factory */
  for (byte i = 0; i < 6; i++) {
    key.keyByte[i] = 0xFF;
  }
  //----------------------------------------------------------------------------
  /* Authenticating the desired data block for Read access using Key A */
  status = mfrc522.PCD_Authenticate(MFRC522::PICC_CMD_MF_AUTH_KEY_A, blockNum, &key, &(mfrc522.uid));
  //----------------------------------------------------------------------------s
  if (status != MFRC522::STATUS_OK){
     Serial.print("Authentication failed for Read: ");
     Serial.println(mfrc522.GetStatusCodeName(status));
     return;
  }
  //----------------------------------------------------------------------------
  else {
    Serial.println("Authentication success");
  }
  //----------------------------------------------------------------------------
  /* Reading data from the Block */
  status = mfrc522.MIFARE_Read(blockNum, readBlockData, &bufferLen);
  if (status != MFRC522::STATUS_OK) {
    Serial.print("Reading failed: ");
    Serial.println(mfrc522.GetStatusCodeName(status));
    return;
  }
  //----------------------------------------------------------------------------
  else {
    readBlockData[16] = ' ';
    readBlockData[17] = ' ';
    Serial.println("Block was read successfully");
  }
  //----------------------------------------------------------------------------
}
#include <SPI.h>
#include <MFRC522.h>
//--------------------------------------------------
//GPIO 0 --> D3
//GPIO 2 --> D4
const uint8_t RST_PIN = D3;
const uint8_t SS_PIN = D4;
//--------------------------------------------------
MFRC522 mfrc522(SS_PIN, RST_PIN);
MFRC522::MIFARE_Key key;
//--------------------------------------------------
/* Be aware of Sector Trailer Blocks */
int blockNum = 4;
/* Create array to read data from Block */
/* Length of buffer should be 4 Bytes
more than the size of Block (16 Bytes) */
byte bufferLen = 18;
byte readBlockData[18];
//--------------------------------------------------
MFRC522::StatusCode status;
//--------------------------------------------------


void setup()
{
  //------------------------------------------------------
  //Initialize serial communications with PC
  Serial.begin(9600);
  //------------------------------------------------------
  //Initialize SPI bus
  SPI.begin();
  //------------------------------------------------------
  //Initialize MFRC522 Module
  mfrc522.PCD_Init();
  Serial.println("Scan a MIFARE 1K Tag to write data...");
  //------------------------------------------------------
}


/****************************************************************************************************
 * loop() function
 ****************************************************************************************************/
void loop()
{
  //------------------------------------------------------------------------------
  /* Prepare the ksy for authentication */
  /* All keys are set to FFFFFFFFFFFFh at chip delivery from the factory */
  for (byte i = 0; i < 6; i++){
    key.keyByte[i] = 0xFF;
  }
  //------------------------------------------------------------------------------
  /* Look for new cards */
  /* Reset the loop if no new card is present on RC522 Reader */
  if ( ! mfrc522.PICC_IsNewCardPresent()){return;}
  //------------------------------------------------------------------------------
  /* Select one of the cards */
  if ( ! mfrc522.PICC_ReadCardSerial()) {return;}
  //------------------------------------------------------------------------------
  Serial.print("\n");
  Serial.println("**Card Detected**");
  /* Print UID of the Card */
  Serial.print(F("Card UID:"));
  for (byte i = 0; i < mfrc522.uid.size; i++){
    Serial.print(mfrc522.uid.uidByte[i] < 0x10 ? " 0" : " ");
    Serial.print(mfrc522.uid.uidByte[i], HEX);
  }
  Serial.print("\n");
  /* Print type of card (for example, MIFARE 1K) */
  Serial.print(F("PICC type: "));
  MFRC522::PICC_Type piccType = mfrc522.PICC_GetType(mfrc522.uid.sak);
  Serial.println(mfrc522.PICC_GetTypeName(piccType));

  //------------------------------------------------------------------------------
  byte buffer[18];
  byte len;
  //wait until 20 seconds for input from serial
  Serial.setTimeout(20000L);
  //MMMMMMMMMMMMMMMMMMMMMMMMMMMMMMMMMMMMMMMMMMMMMMMMMMMMMMMMMMMMMMM
  Serial.println(F("---------------------------------------"));
  Serial.println(F("Enter Student ID, ending with #"));
  len = Serial.readBytesUntil('#', (char *) buffer, 16);
  //add empty spaces to the remaining bytes of buffer
  for (byte i = len; i < 16; i++) buffer[i] = ' ';
  blockNum = 4;
  WriteDataToBlock(blockNum, buffer);
  ReadDataFromBlock(blockNum, readBlockData);
  dumpSerial(blockNum, readBlockData);
  //MMMMMMMMMMMMMMMMMMMMMMMMMMMMMMMMMMMMMMMMMMMMMMMMMMMMMMMMMMMMMMM
  Serial.println(F("---------------------------------------"));
  Serial.println(F("Enter First Name, ending with #"));
  len = Serial.readBytesUntil('#', (char *) buffer, 16);
  for (byte i = len; i < 16; i++) buffer[i] = ' ';
  blockNum = 5;
  WriteDataToBlock(blockNum, buffer);
  ReadDataFromBlock(blockNum, readBlockData);
  dumpSerial(blockNum, readBlockData);
  //MMMMMMMMMMMMMMMMMMMMMMMMMMMMMMMMMMMMMMMMMMMMMMMMMMMMMMMMMMMMMMM
  Serial.println(F("---------------------------------------"));
  Serial.println(F("Enter Last Name, ending with #"));
  len = Serial.readBytesUntil('#', (char *) buffer, 16);
  for (byte i = len; i < 16; i++) buffer[i] = ' ';
  blockNum = 6;
  WriteDataToBlock(blockNum, buffer);
  ReadDataFromBlock(blockNum, readBlockData);
  dumpSerial(blockNum, readBlockData);
  //MMMMMMMMMMMMMMMMMMMMMMMMMMMMMMMMMMMMMMMMMMMMMMMMMMMMMMMMMMMMMMM
  Serial.println(F("---------------------------------------"));
  Serial.println(F("Enter Phone Number, ending with #"));
  len = Serial.readBytesUntil('#', (char *) buffer, 16);
  for (byte i = len; i < 16; i++) buffer[i] = ' ';
  blockNum = 8;
  WriteDataToBlock(blockNum, buffer);
  ReadDataFromBlock(blockNum, readBlockData);
  dumpSerial(blockNum, readBlockData);
  Serial.println(F("---------------------------------------"));
  Serial.println(F("Enter Address, ending with #"));
  len = Serial.readBytesUntil('#', (char *) buffer, 16);
  for (byte i = len; i < 16; i++) buffer[i] = ' ';
  blockNum = 9;
  WriteDataToBlock(blockNum, buffer);
  ReadDataFromBlock(blockNum, readBlockData);
  dumpSerial(blockNum, readBlockData);
}


/****************************************************************************************************
 * Writ() function
 ****************************************************************************************************/
void WriteDataToBlock(int blockNum, byte blockData[])
{
   //Serial.print("Writing data on block ");
   //Serial.println(blockNum);
  //------------------------------------------------------------------------------
  /* Authenticating the desired data block for write access using Key A */
  status = mfrc522.PCD_Authenticate(MFRC522::PICC_CMD_MF_AUTH_KEY_A, blockNum, &key, &(mfrc522.uid));
  if (status != MFRC522::STATUS_OK){
    Serial.print("Authentication failed for Write: ");
    Serial.println(mfrc522.GetStatusCodeName(status));
    return;
  }
  //------------------------------------------------------------------------------
  else {
    //Serial.print("Authentication OK - ");
  }
  //------------------------------------------------------------------------------
  /* Write data to the block */
  status = mfrc522.MIFARE_Write(blockNum, blockData, 16);
  if (status != MFRC522::STATUS_OK) {
    Serial.print("Writing to Block failed: ");
    Serial.println(mfrc522.GetStatusCodeName(status));
    return;
  }
  else {
    //Serial.println("Write OK");
  }
  //------------------------------------------------------------------------------
}


/****************************************************************************************************
 * ReadDataFromBlock() function
 ****************************************************************************************************/
void ReadDataFromBlock(int blockNum, byte readBlockData[])
{
   //Serial.print("Reading data from block ");
   //Serial.println(blockNum);
  //----------------------------------------------------------------------------
  /* Prepare the ksy for authentication */
  /* All keys are set to FFFFFFFFFFFFh at chip delivery from the factory */
  for (byte i = 0; i < 6; i++) {
    key.keyByte[i] = 0xFF;
  }
  //------------------------------------------------------------------------------
  /* Authenticating the desired data block for Read access using Key A */
  status = mfrc522.PCD_Authenticate(MFRC522::PICC_CMD_MF_AUTH_KEY_A, blockNum, &key, &(mfrc522.uid));
  //------------------------------------------------------------------------------
  if (status != MFRC522::STATUS_OK){
   Serial.print("Authentication failed for Read: ");
   Serial.println(mfrc522.GetStatusCodeName(status));
   return;
  }
  else {
    //Serial.print("Authentication OK - ");
  }
  //------------------------------------------------------------------------------
  /* Reading data from the Block */
  status = mfrc522.MIFARE_Read(blockNum, readBlockData, &bufferLen);
  if (status != MFRC522::STATUS_OK){
    Serial.print("Reading failed: ");
    Serial.println(mfrc522.GetStatusCodeName(status));
    return;
  }
  else {
    //readBlockData[16] = ' ';
    //readBlockData[17] = ' ';
    //Serial.println("Read OK");
  }
  //------------------------------------------------------------------------------
}


/****************************************************************************************************
 * dumpSerial() function
 ****************************************************************************************************/
void dumpSerial(int blockNum, byte blockData[])
{
  Serial.print("\n");
  Serial.print("Data saved on block");
  Serial.print(blockNum);
  Serial.print(": ");
  for (int j=0 ; j<16 ; j++){
    Serial.write(readBlockData[j]);
  }
  Serial.print("\n");

  //Empty readBlockData array
  for( int i = 0; i < sizeof(readBlockData);  ++i )
   readBlockData[i] = (char)0; //empty space
}
//------------------------------------------------------------------------
// Created by: Tauseef Ahmad
// Created on: 17 July, 2022

// Tutorial: https://youtu.be/Bgs_3F5rL5Q
// ------------------------------------------------------------------------


 // Enter Spreadsheet ID here
var SS = SpreadsheetApp.openById('1d_YCHxeYUg-cxEVnnJq2UrL7pOwWdm2lXRXQe013Gw8');
var timezone = "GMT+05:30";
var hours = 0;
var str = "";


function doPost(e) {

  var parsedData;
  var result = {};

  try {
    parsedData = JSON.parse(e.postData.contents);
  }
  catch(f){
    return ContentService.createTextOutput("Error in parsing request body: " + f.message);
  }

  if (parsedData !== undefined){
    var flag = parsedData.format;
    if (flag === undefined){
      flag = 0;
    }

    var sheet = SS.getSheetByName(parsedData.sheet_name); // sheet name to publish data to is specified in Arduino code
    var dataArr = parsedData.values.split(","); // creates an array of the values to publish

    //var date_now = Utilities.formatDate(new Date(), "CST", "yyyy/MM/dd"); // gets the current date
    //var time_now = Utilities.formatDate(new Date(), "CST", "hh:mm:ss a"); // gets the current time
    var Curr_Date = new Date(new Date().setHours(new Date().getHours() + hours));
    var Curr_Time = Utilities.formatDate(Curr_Date, timezone, 'HH:mm:ss');

    var value0 = dataArr [0]; // value0 from Arduino code - Student ID
    var value1 = dataArr [1]; // value1 from Arduino code - First Name
    var value2 = dataArr [2]; // value2 from Arduino code - Last Name
    var value3 = dataArr [3]; // value0 from Arduino code - Phone Number
    var value4 = dataArr [4]; // value1 from Arduino code - Address


    // read and execute command from the "payload_base" string specified in Arduino code
    switch (parsedData.command) {

      case "insert_row":

         sheet.insertRows(2); // insert full row directly below header text

         //var range = sheet.getRange("A2:D2");              // use this to insert cells just above the existing data instead of inserting an entire row
         //range.insertCells(SpreadsheetApp.Dimension.ROWS); // use this to insert cells just above the existing data instead of inserting an entire row

         sheet.getRange('A2').setValue(Curr_Date); // publish current date to cell A2
         sheet.getRange('B2').setValue(Curr_Time); // publish current time to cell B2
         sheet.getRange('C2').setValue(value0);   // publish Student ID from Arduino code to cell C2
         sheet.getRange('D2').setValue(value1);   // publish First Name from Arduino code to cell D2
         sheet.getRange('E2').setValue(value2);   // publish Last Name from Arduino code to cell E2
         sheet.getRange('F2').setValue(value3);   // publish Phone Number from Arduino code to cell F2
         sheet.getRange('G2').setValue(value4);   // publish Address from Arduino code to cell G2

         str = "Success"; // string to return back to Arduino serial console
         SpreadsheetApp.flush();
         break;

      case "append_row":

         var publish_array = new Array(); // create a new array

         publish_array [0] = date_now; // add current date to position 0 in publish_array
         publish_array [1] = time_now; // add current time to position 1 in publish_array
         publish_array [2] = value0;   // add value0 from Arduino code to position 2 in publish_array
         publish_array [3] = value1;   // add value1 from Arduino code to position 3 in publish_array
         publish_array [4] = value2;   // add value2 from Arduino code to position 4 in publish_array

         sheet.appendRow(publish_array); // publish data in publish_array after the last row of data in the sheet

         str = "Success"; // string to return back to Arduino serial console
         SpreadsheetApp.flush();
         break;

    }

    return ContentService.createTextOutput(str);
  } // endif (parsedData !== undefined)

  else {
    return ContentService.createTextOutput("Error! Request body empty or in incorrect format.");
  }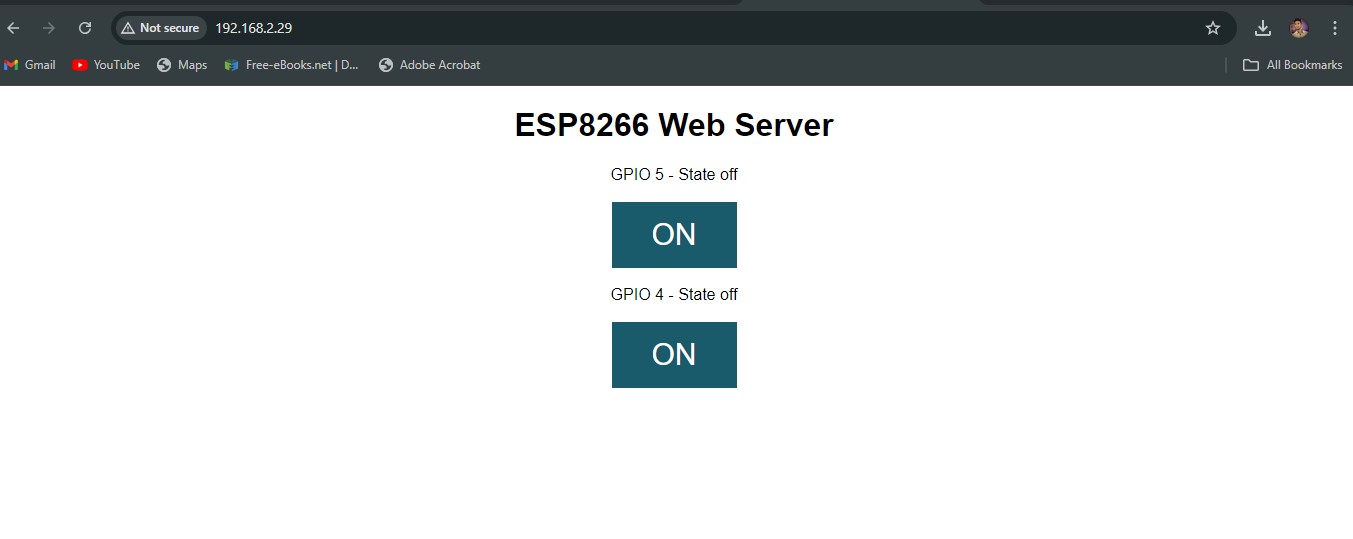
}The objective of an ESP8266 web server with LED control is to remotely turn an LED on or off through a web interface hosted by the ESP8266.
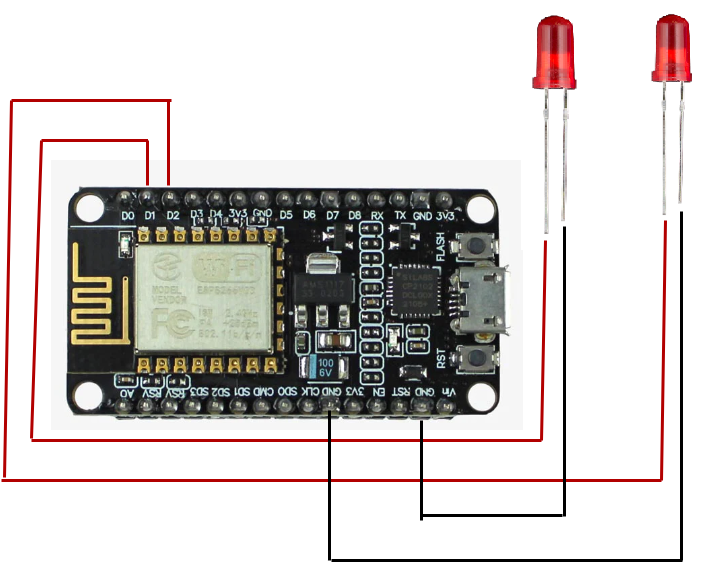
*Note: The negative pin (LED) connects to GND in the built-in circuit, no additional connection needed.
#include <ESP8266WiFi.h>
// Replace with your network credentials
const char* ssid  = "xxxxxx";
const char* password = "xxxxxx";
// Set web server port number to 80
WiFiServer server(80);
// Variable to store the HTTP request
String header;
// Auxiliar variables to store the current output state
String output5State = "off";
String output4State = "off";
// Assign output variables to GPIO pins
const int output5 = 5;
const int output4 = 4;
// Current time
unsigned long currentTime = millis();
// Previous time
unsigned long previousTime = 0;
// Define timeout time in milliseconds (example: 2000ms = 2s)
const long timeoutTime = 2000;
void setup() {
 Serial.begin(115200);
 // Initialize the output variables as outputs
 pinMode(output5, OUTPUT);
 pinMode(output4, OUTPUT);
 // Set outputs to LOW
 digitalWrite(output5, LOW);
 digitalWrite(output4, LOW);
 // Connect to Wi-Fi network with SSID and password
 Serial.print("Connecting to ");
 Serial.println(ssid);
 WiFi.begin(ssid, password);
 while (WiFi.status() != WL_CONNECTED) {
  delay(500);
  Serial.print(".");
 }
 // Print local IP address and start web server
 Serial.println("");
 Serial.println("WiFi connected.");
 Serial.println("IP address: ");
 Serial.println(WiFi.localIP());
 server.begin();
}
void loop(){
 WiFiClient client = server.available(); // Listen for incoming clients

 if (client) {              // If a new client connects,
  Serial.println("New Client.");     // print a message out in the serial port
  String currentLine = "";        // make a String to hold incoming data from the client
  currentTime = millis();
  previousTime = currentTime;
  while (client.connected() && currentTime - previousTime <= timeoutTime) { // loop while the client's connected
   currentTime = millis();
   if (client.available()) {      // if there's bytes to read from the client,
    char c = client.read();      // read a byte, then
    Serial.write(c);          // print it out the serial monitor
    header += c;
    if (c == '\n') {          // if the byte is a newline character
     // if the current line is blank, you got two newline characters in a row.
     // that's the end of the client HTTP request, so send a response:
     if (currentLine.length() == 0) {
      // HTTP headers always start with a response code (e.g. HTTP/1.1 200 OK)
      // and a content-type so the client knows what's coming, then a blank line:
      client.println("HTTP/1.1 200 OK");
      client.println("Content-type:text/html");
      client.println("Connection: close");
      client.println();
      // turns the GPIOs on and off
      if (header.indexOf("GET /5/on") >= 0) {
       Serial.println("GPIO 5 on");
       output5State = "on";
       digitalWrite(output5, HIGH);
      } else if (header.indexOf("GET /5/off") >= 0) {
       Serial.println("GPIO 5 off");
       output5State = "off";
       digitalWrite(output5, LOW);
      } else if (header.indexOf("GET /4/on") >= 0) {
       Serial.println("GPIO 4 on");
       output4State = "on";
       digitalWrite(output4, HIGH);
      } else if (header.indexOf("GET /4/off") >= 0) {
       Serial.println("GPIO 4 off");
       output4State = "off";
       digitalWrite(output4, LOW);
      }
// Display the HTML web page
      client.println("<!DOCTYPE html><html>");
      client.println("<head><meta name=\"viewport\" content=\"width=device-width, initial-scale=1\">");
      client.println("<link rel=\"icon\" href=\"data:,\">");
      // CSS to style the on/off buttons
      // Feel free to change the background-color and font-size attributes to fit your preferences
      client.println("<style>html { font-family: Helvetica; display: inline-block; margin: 0px auto; text-align: center;}");
      client.println(".button { background-color: #195B6A; border: none; color: white; padding: 16px 40px;");
      client.println("text-decoration: none; font-size: 30px; margin: 2px; cursor: pointer;}");
      client.println(".button2 {background-color: #77878A;}</style></head>");

      // Web Page Heading
      client.println("<body><h1>ESP8266 Web Server</h1>");
      // Display current state, and ON/OFF buttons for GPIO 5
      client.println("<p>GPIO 5 - State " + output5State + "</p>");
      // If the output5State is off, it displays the ON button
      if (output5State=="off") {
       client.println("<p><a href=\"/5/on\"><button class=\"button\">ON</button></a></p>");
      }
 else {
       client.println("<p><a href=\"/5/off\"><button class=\"button button2\">OFF</button></a></p>");
      }
      // Display current state, and ON/OFF buttons for GPIO 4
      client.println("<p>GPIO 4 - State " + output4State + "</p>");
      // If the output4State is off, it displays the ON button
      if (output4State=="off") {
       client.println("<p><a href=\"/4/on\"><button class=\"button\">ON</button></a></p>");
}
 else {
       client.println("<p><a href=\"/4/off\"><button class=\"button button2\">OFF</button></a></p>");
      }
      client.println("</body></html>");
             // The HTTP response ends with another blank line
      client.println();
      // Break out of the while loop
      break;
     } else { // if you got a newline, then clear currentLine
      currentLine = "";
     }
    }
else if (c != '\r') { // if you got anything else but a carriage return character,
 currentLine += c; // add it to the end of the currentLine
 }
 }
}
// Clear the header variable
 header = "";
 // Close the connection
 client.stop();
 Serial.println("Client disconnected.");
 Serial.println("");
 } }
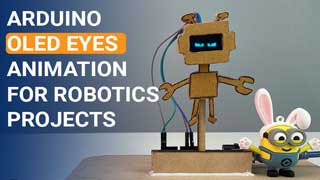
The goal of using Arduino OLED animations is to create visual effects or display dynamic information on the OLED screen.
#include <Arduino.h>
#include <U8g2lib.h>
#include <Wire.h> // library requires for IIC communication
U8G2_SSD1306_128X64_NONAME_F_HW_I2C u8g2(U8G2_R0, /*
reset=*/ U8X8_PIN_NONE); // initialization for the used OLED display
// images from #include <Arduino.h>
static const unsigned char image_Lock_7x8_bits[] U8X8_PROGMEM =
{0x1c,0x22,0x22,0x7f,0x7f,0x77,0x7f,0x3e};
static const unsigned char image_Bluetooth_Idle_5x8_bits[]
U8X8_PROGMEM = {0x04,0x0d,0x16,0x0c,0x0c,0x16,0x0d,0x04};
static const unsigned char image_Volup_8x6_bits[] U8X8_PROGMEM =
{0x48,0x8c,0xaf,0xaf,0x8c,0x48};
static const unsigned char image_Alert_9x8_bits[] U8X8_PROGMEM =
{0x10,0x00,0x38,0x00,0x28,0x00,0x6c,0x00,0x6c,0x00,0xfe,0x00,0xee,0
x00,0xff,0x01};
int progress = 0; // progress of the progressbar
char buffer[32]; // helper buffer to construct a string to be displayed
void setup(void) {
u8g2.begin(); // start the u8g2 library
}
void loop(void) {
u8g2.clearBuffer(); // clear the internal memory
// code from #include <Arduino.h>
u8g2.setBitmapMode(1);
u8g2.drawFrame(12, 21, 104, 20);
u8g2.drawBox(14, 23, progress, 16); // draw the progressbar fill
u8g2.setFont(u8g2_font_helvB08_tr);
sprintf(buffer, "Progress: %d%%", progress); // construct a string with the
progress variable
u8g2.drawStr(33, 53, buffer); // display the string
u8g2.setFont(u8g2_font_haxrcorp4089_tr);
u8g2.drawStr(0, 7, "Progress Bar Screen");
u8g2.drawLine(0, 9, 127, 9);
u8g2.drawXBMP( 100, 0, 7, 8, image_Lock_7x8_bits);
u8g2.drawXBMP( 111, 0, 5, 8, image_Bluetooth_Idle_5x8_bits);
u8g2.drawXBMP( 120, 1, 8, 6, image_Volup_8x6_bits);
u8g2.drawXBMP( 22, 45, 9, 8, image_Alert_9x8_bits);
u8g2.sendBuffer(); // transfer internal memory to the display
// increase the progress value to go over 0-100
progress = progress + 1;
if (progress > 100) {
progress = 0;
}
}
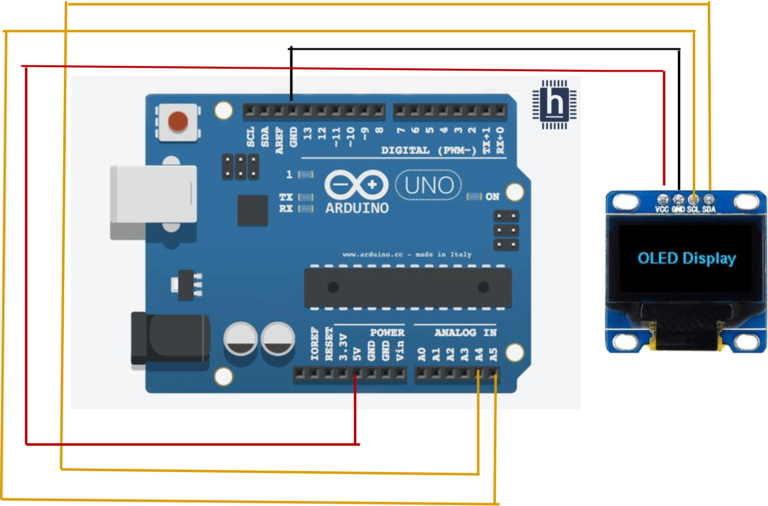
To display real-time humidity and temperature on the OLED screen.
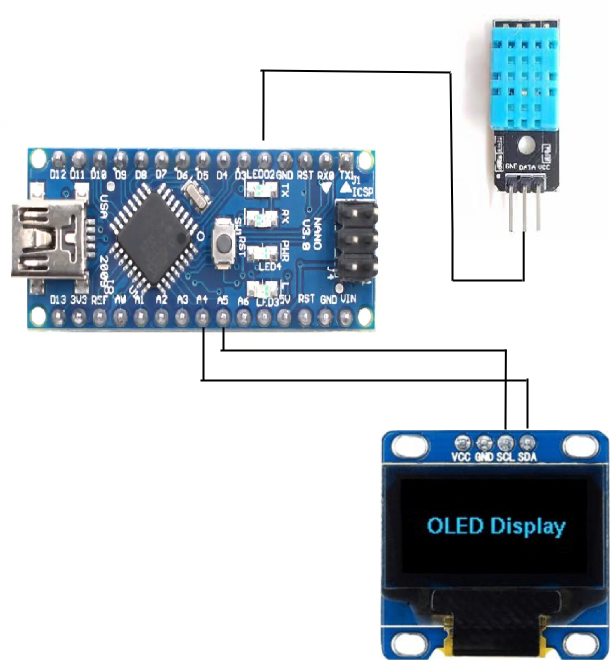
#include "DHT.h"
#define DHT11Pin 2
#define DHTType DHT11
//OLED
#include <Wire.h>
#include <Adafruit_GFX.h>
#include <Adafruit_SSD1306.h>

DHT HT(DHT11Pin,DHTType);
float humi;
float tempC;
float tempF;

//OLED define
#define SCREEN_WIDTH 128 //OLED display width, in pixels
#define SCREEN_HEIGHT 64 //OLED display height, in pixels
//SSD1306 display connected to I2C (SDA, SCL pins)
Adafruit_SSD1306 display(SCREEN_WIDTH, SCREEN_HEIGHT, &Wire, -1);

void setup() {
 Serial.begin(9600);
 //For DHT11
 HT.begin();
 //Necessary code for OLED I2C
 if(!display.begin(SSD1306_SWITCHCAPVCC, 0x3C)) { // Address 0x3D for 128x64
  Serial.println(F("SSD1306 allocation failed"));
  for(;;);
 }
 display.display(); //Displays the starting logo
 delay(1000);
 display.clearDisplay();
}
void loop() {
 delay(1000);
 humi = HT.readHumidity();
 tempC = HT.readTemperature();
 tempF = HT.readTemperature(true);

 display.clearDisplay();
 oledDisplayHeader();
 //configures the position of the readings. (charactersize, x axis value, y axis value, reading, symbol)
oledDisplay(2,90,28,humi,"%");
 oledDisplay(3,-10,44,tempC,"C");
 oledDisplay(3,-10,16,tempF,"F");
 display.display();
}
void oledDisplayHeader(){
 //configures position and qualities of headers
 display.setTextSize(1);
 display.setTextColor(WHITE);
 display.setCursor(0, 0);
 display.print("Temperature");
 display.setCursor(80, 0);
 display.print("Humidity");
}
void oledDisplay(int size, int x,int y, float value, String unit){
 int charLen=18;
 int xo=x+charLen*3.2;
 int xunit=x+charLen*3.6;
 int xval = x;
 display.setTextSize(size);
 display.setTextColor(WHITE);

 if (unit=="%"){
  display.setCursor(x, y);
  display.print(value,0);
  display.print(unit);
 }
 else {
 if (value>99){
 xval=x;
 } else {
 xval=x+charLen;
 }
 display.setCursor(xval, y);
 display.print(value,0);
 display.drawCircle(xo, y+2, 2, WHITE); // print degree symbols
 display.setCursor(xunit, y);
 display.print(unit);
 }
 }
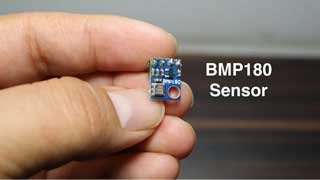
To measure atmospheric pressure and temperature, use a BMP180 sensor with an Arduino Uno.
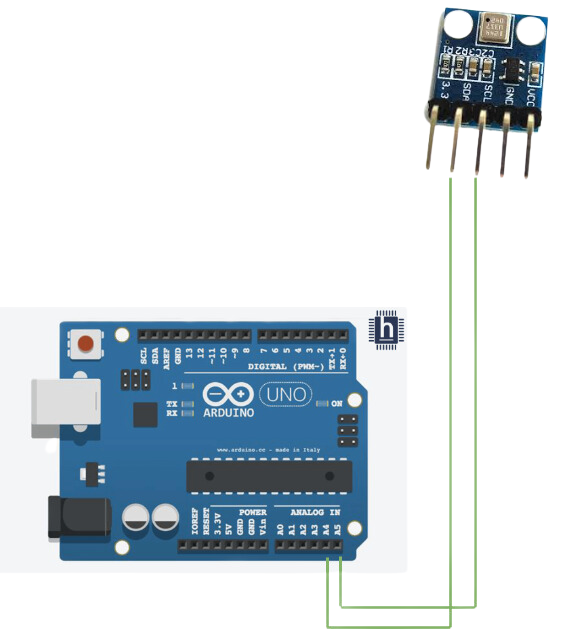
#include <SFE_BMP180.h>
#include <LiquidCrystal_I2C.h>
#include <Wire.h>

// You will need to create an SFE_BMP180 object, here called "pressure":

SFE_BMP180 pressure;

const int buzzer = 9; //buzzer to arduino pin 9

#define ALTITUDE 1655.0 // Altitude of SparkFun's HQ in Boulder, CO. in meters

LiquidCrystal_I2C lcd(0x27, 16, 2);

void setup()
{
  Serial.begin(9600);
  Serial.println("REBOOT");
  pinMode(buzzer, OUTPUT); // Set buzzer - pin 9 as an output
  lcd.backlight();
  lcd.init();
  lcd.clear();
  // Initialize the sensor (it is important to get calibration values stored on the device).

  if (pressure.begin())
    Serial.println("BMP180 init success");
  else
  {
    // Oops, something went wrong, this is usually a connection problem,
    // see the comments at the top of this sketch for the proper connections.

    Serial.println("BMP180 init fail\n\n");
    while(1); // Pause forever.

  }
}

void loop()
{
  char status;
  double T,P,p0,a;

  // Loop here getting pressure readings every 10 seconds.

  // If you want sea-level-compensated pressure, as used in weather reports,
  // you will need to know the altitude at which your measurements are taken.
  // We're using a constant called ALTITUDE in this sketch:

  Serial.println();
  Serial.print("provided altitude: ");
  Serial.print(ALTITUDE,0);
  Serial.print(" meters, ");
  Serial.print(ALTITUDE*3.28084,0);
  Serial.println(" feet");

  // If you want to measure altitude, and not pressure, you will instead need
  // to provide a known baseline pressure. This is shown at the end of the sketch.

  // You must first get a temperature measurement to perform a pressure reading.

  // Start a temperature measurement:
  // If request is successful, the number of ms to wait is returned.
  // If request is unsuccessful, 0 is returned.

  status = pressure.startTemperature();
  if (status != 0)
  {
    // Wait for the measurement to complete:
    delay(status);

    // Retrieve the completed temperature measurement:
    // Note that the measurement is stored in the variable T.
    // Function returns 1 if successful, 0 if failure.

    status = pressure.getTemperature(T);
    if (status != 0)
    {
      // Print out the measurement:
      Serial.print("temperature: ");
      Serial.print(T,2);
      Serial.print(" deg C, ");
      Serial.print((9.0/5.0)*T+32.0,2);
      Serial.println(" deg F");

      // Start a pressure measurement:
      // The parameter is the oversampling setting, from 0 to 3 (highest res, longest wait).
      // If request is successful, the number of ms to wait is returned.
      // If request is unsuccessful, 0 is returned.

      status = pressure.startPressure(3);
      if (status != 0)
      {
        // Wait for the measurement to complete:
        delay(status);

        // Retrieve the completed pressure measurement:
        // Note that the measurement is stored in the variable P.
        // Note also that the function requires the previous temperature measurement (T).
        // (If temperature is stable, you can do one temperature measurement for a number of pressure measurements.)
        // Function returns 1 if successful, 0 if failure.

        status = pressure.getPressure(P,T);
        if (status != 0)
        {
          // Print out the measurement:
          Serial.print("absolute pressure: ");
          Serial.print(P,2);
          Serial.print(" mb, ");
          Serial.print(P*0.0295333727,2);
          Serial.println(" inHg");

          // The pressure sensor returns abolute pressure, which varies with altitude.
          // To remove the effects of altitude, use the sealevel function and your current altitude.
          // This number is commonly used in weather reports.
          // Parameters: P = absolute pressure in mb, ALTITUDE = current altitude in m.
          // Result: p0 = sea-level compensated pressure in mb

          p0 = pressure.sealevel(P,ALTITUDE); // we're at 1655 meters (Boulder, CO)
          Serial.print("relative (sea-level) pressure: ");
          Serial.print(p0,2);
          Serial.print(" mb, ");
          Serial.print(p0*0.0295333727,2);
          Serial.println(" inHg");

          // On the other hand, if you want to determine your altitude from the pressure reading,
          // use the altitude function along with a baseline pressure (sea-level or other).
          // Parameters: P = absolute pressure in mb, p0 = baseline pressure in mb.
          // Result: a = altitude in m.

          a = pressure.altitude(P,p0);
          Serial.print("computed altitude: ");
          Serial.print(a,0);
          Serial.print(" meters, ");
          Serial.print(a*3.28084,0);
          Serial.println(" feet");
        }
        else Serial.println("error retrieving pressure measurement\n");
      }
      else Serial.println("error starting pressure measurement\n");
    }
    else Serial.println("error retrieving temperature measurement\n");
  }
  else Serial.println("error starting temperature measurement\n");

  delay(5000);  // Pause for 5 seconds.

    lcd.setCursor(0, 0);
    lcd.print("pressure/temp");
    lcd.setCursor(0,1);
    lcd.print(P);
    lcd.print("Pa");
    lcd.print("/");
    lcd.print(T);
    lcd.print("C");
}
To monitor access, signaling authorized access with a green LED and unauthorized access with a red LED based on RFID tag scans.
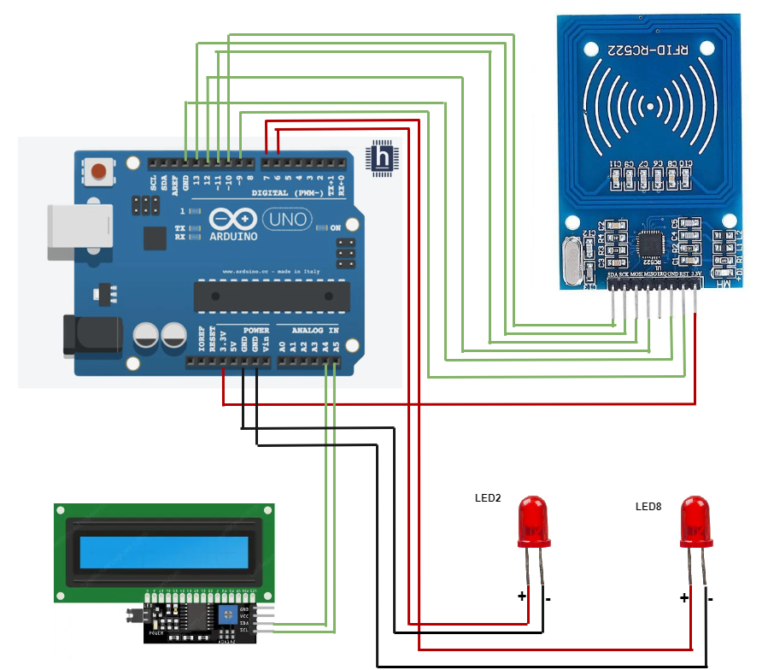
*Note: The negative pin (LED) connects to GND in the built-in circuit, no additional connection needed.
#include <SPI.h>
#include <MFRC522.h>
#include <Wire.h>
#include <LiquidCrystal_I2C.h>
//declare the uid no of rfid card in the below variable as decimal value
const byte monUID[4] = {xx, xx, xx, xx};
bool valid=true;
#define PIN_LED_ROUGE 7
#define PIN_LED_VERTE 6
#define PIN_RST 9
#define PIN_SDA 10
LiquidCrystal_I2C lcd(0x27, 16, 2);
MFRC522 rfid(PIN_SDA, PIN_RST);
void setup(){
SPI.begin();
rfid.PCD_Init();
pinMode(PIN_LED_ROUGE, OUTPUT);
digitalWrite(PIN_LED_ROUGE, HIGH);
pinMode(PIN_LED_VERTE, OUTPUT);
digitalWrite(PIN_LED_VERTE, HIGH);
lcd.init();
lcd.init();
lcd.backlight();
lcd.setCursor(0, 0);
lcd.print("Blue Nile Soft :)");
delay(5000);
lcd.clear();
}
void loop(){
if (rfid.PICC_IsNewCardPresent()) {
if (rfid.PICC_ReadCardSerial()) {
for (int i = 0; i < rfid.uid.size; i++) {
if (rfid.uid.uidByte[i] != monUID[i])
{valid=false;}
else
{valid=true;}
}
if (valid == 1) {
// digitalWrite(PIN_LED_VERTE, HIGH);
lcd.print("Access Granted :)");
digitalWrite(PIN_LED_VERTE, LOW);
delay(1000);
digitalWrite(PIN_LED_VERTE, HIGH);
lcd.clear();
}
else // UID non valide
{
// digitalWrite(PIN_LED_ROUGE, HIGH);
lcd.print("Access Denied :(");
digitalWrite(PIN_LED_ROUGE, LOW);
delay(1000);
digitalWrite(PIN_LED_ROUGE, HIGH);
lcd.clear();
} }}}
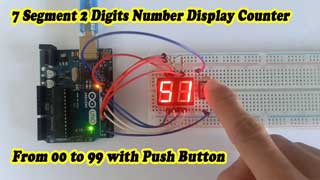
Display numerical data using a 2-digit seven-segment display with an Arduino Uno.
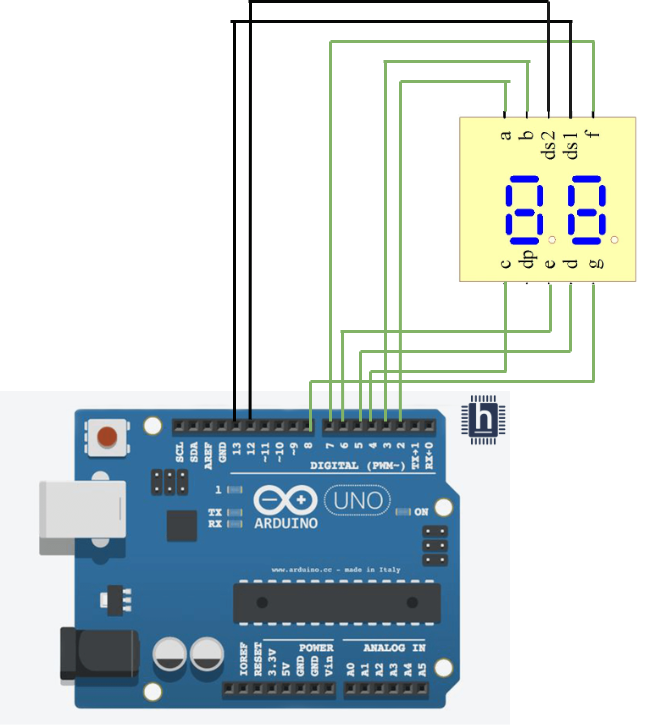
//Prepare binary array for all 7 segment to turn on 7 segment at
position of a,b,c,d,e,f,g
int digit[10] = {0b0111111, 0b0000110, 0b1011011, 0b1001111,
0b1100110, 0b1101101, 0b1111101, 0b0000111, 0b1111111,
0b1101111};
int digit1, digit2; // initialize individual digit to controll each segment
void setup(){
for (int i = 2; i < 9; i++) {
pinMode(i, OUTPUT); // declare 0-9 th pin as output
}
pinMode(12, OUTPUT); //declare 7 seg Digit1 pin as output
pinMode(13, OUTPUT);//declare 7 seg Digit2 pin as output
}
void loop() {
for (int j = 0; j <= 99; j++)// for lopp to pass value from 00-99
{
digit2 = j / 10;
digit1 = j % 10;
for ( int k = 0; k < 20; k++)// For loop to control the digit control to
print 00-99
{
digitalWrite(12, HIGH);
digitalWrite(13, LOW);
dis(digit2);
delay(10);
digitalWrite(13, HIGH);
digitalWrite(12, LOW);
dis(digit1);
delay(10);
} } }
void dis(int num){
for (int i = 2; i < 9; i++) {
digitalWrite(i, bitRead(digit[num], i - 2));
} }
The aim of this project prototype is it to design an reverse parking system which will assist the driver to make parking easily.
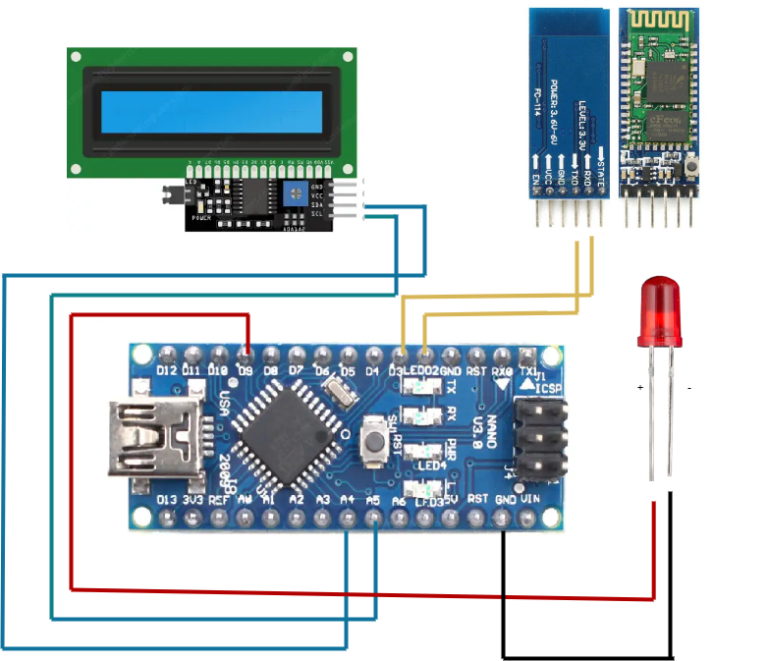
*Note: The negative pin (LED) connects to GND in the built-in circuit, no additional connection needed
#include <Wire.h>
#include <LiquidCrystal_I2C.h>
#include <SoftwareSerial.h>
// Initialize the I2C LCD with the address 0x27
LiquidCrystal_I2C lcd(0x27, 16, 2);
// Create a SoftwareSerial port for the Bluetooth module
SoftwareSerial bluetooth(2, 3); // RX, TX
// LED pin
const int ledPin = 9;
void setup() {
// Initialize the LCD with 16 columns and 2 rows
lcd.begin(16, 2);
lcd.init();
lcd.backlight();
// Initialize Bluetooth communication at 9600 baud
bluetooth.begin(9600);
// Set LED pin as output
pinMode(ledPin, OUTPUT);
// Display a welcome message
lcd.setCursor(0, 0);
lcd.print("Bluetooth LED");
lcd.setCursor(0, 1);
lcd.print("Control Ready");
delay(2000);
lcd.clear();
}
void loop() {
// Check if data is available from the Bluetooth module
if (bluetooth.available()) {
char data = bluetooth.read(); // Read the incoming data
if (data == '1') {
digitalWrite(ledPin, LOW); // Turn the LED on
lcd.clear();
lcd.setCursor(0, 0);
lcd.print("LED Status:");
lcd.setCursor(0, 1);
lcd.print("ON");
}
else if (data == '0') {
digitalWrite(ledPin, HIGH); // Turn the LED off
lcd.clear();
lcd.setCursor(0, 0);
lcd.print("LED Status:");
lcd.setCursor(0, 1);
lcd.print("OFF");
} } }The aim of this project prototype is it to design an reverse parking system which will assist the driver to make parking easily
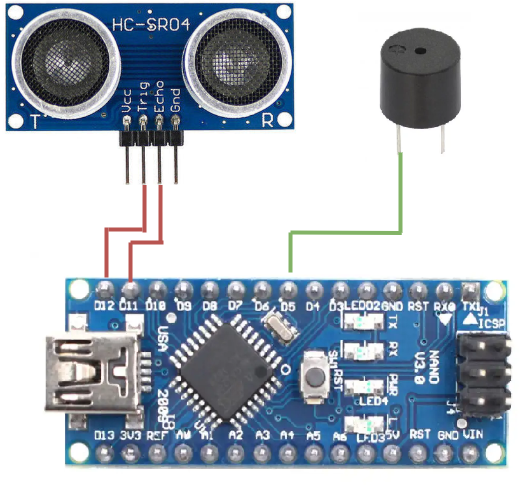
#define trigPin 12
#define echoPin 11
int Buzzer= 5;
int duration, distance;

void setup() {
  Serial.begin (9600);

  pinMode(trigPin, OUTPUT);
  pinMode(echoPin, INPUT);
  pinMode(Buzzer, OUTPUT);

}

void loop() {

  digitalWrite(trigPin, HIGH);
  delayMicroseconds(1000);
  digitalWrite(trigPin, LOW);
  duration = pulseIn(echoPin, HIGH);
  distance = (duration / 2) / 29.1;

  if (distance <= 60 && distance >= 50)
  {
    Serial.println("object detected \n");
    Serial.print("distance= ");
    analogWrite(Buzzer, 0);
    delay (500) ;
    analogWrite(Buzzer, 255);
     //tone(5,440,1000);
    delay (500) ;

  }

  else if (distance <= 50 && distance >= 40)
  {
    Serial.println("object detected \n");
    Serial.print("distance= ");
    analogWrite(Buzzer, 0);
    delay (450) ;
    analogWrite(Buzzer, 255);
     //tone(5,440,1000);
    delay (450) ;

  }

  else if (distance <= 40 && distance >= 30)
  {
    Serial.println("object detected \n");
    Serial.print("distance= ");
    analogWrite(Buzzer, 0);
    delay (250) ;
    analogWrite(Buzzer, 255);
    // tone(5,440,1000);
    delay (250) ;

  }
  else if (distance <= 30 && distance >= 20)
  {
    Serial.println("object detected \n");
    Serial.print("distance= ");
    analogWrite(Buzzer, 0);
    delay (150) ;
    analogWrite(Buzzer, 255);
     //tone(5,440,1000);
    delay (150) ;

  }

  else if (distance <= 20 && distance >= 10)
  {
    Serial.println("object detected \n");
    Serial.print("distance= ");
    analogWrite(Buzzer, 0);
    delay (100) ;
    analogWrite(Buzzer, 255);
     //tone(5,440,1000);
    delay (100) ;

  }

  else if (distance <= 10 && distance > 5)
  {
    Serial.println("object detected \n");
    Serial.print("distance= ");
    analogWrite(Buzzer, 0);
    delay (50) ;
    analogWrite(Buzzer, 255);
     //tone(5,440,1000);
    delay (50) ;

  }

  else if (distance <= 5 && distance >= 1)
  {
    Serial.println("object detected \n");
    Serial.print("distance= ");
    analogWrite(Buzzer, 0);
    delay (10) ;
    analogWrite(Buzzer, 255);
     //tone(5,440,1000);
    delay (10) ;

  }
  else
    Serial.println("object detected \n");
  Serial.print("distance= ");
  Serial.print(distance);
  analogWrite(Buzzer, 255);
   //tone(5,440,1000);
  {
  }
}
The objective of using a Bluetooth module with Arduino is to create a system that can be controlled remotely using a smartphone or tablet
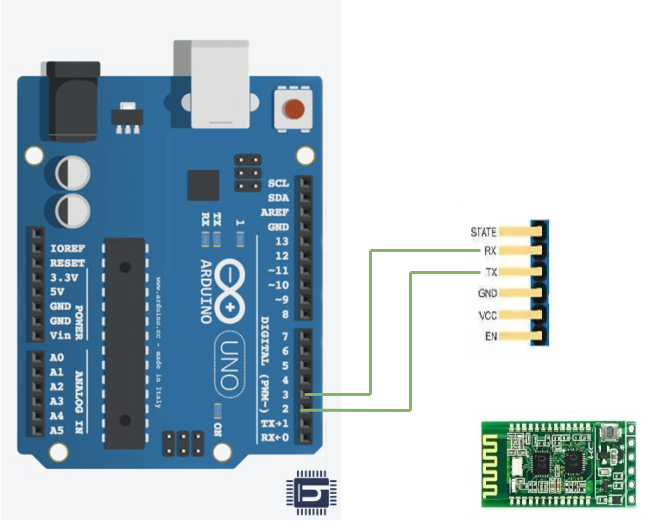
#include<Softwareserial.h>
/*Create object nasoftwareserial*/
SoftwareSerial bt(2,3);/*(Rx,Tx)*/
void setup() {
bt.begin(9600);/*Define baud rate for software serial communication*/
Serial.begin(9600);/* Define baud rate for serial communication*/
}
void loop() {
if (bt.available()) /* If data is available on serial port*/
{
Serial.write(bt.read());/* Print character received on to the serial monitor*/
}
}
Blue Nile Software Systems Private Ltd is a professional IT Company supported by DMI Foundations,servicing the society for the past 18 years, it was incorporated on 26 August 2005.
Copyright © All rights reserved | Design & Developed by Blue Nile Software Systems Pvt. Ltd