OBJECTIVE
The goal of using Arduino OLED animations is to create visual effects or display dynamic information on the OLED screen.
MODULES REQUIRED
- Arduino UNO
- Jumper wire
- OLED DISPLAY
SCHEMATIC DIAGRAM
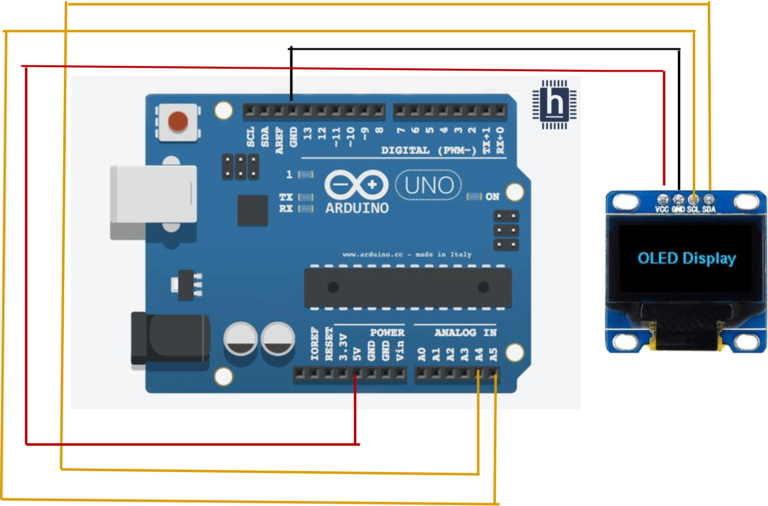
Connect OLED:
- Connect the VCC pin on the OLED to Arduino uno pin 5V.
- Connect the GND pin on the OLED to Arduino uno pin GND
- Connect the SDA pin on the OLED to Arduino UNO A4
- Connect the SCL pin on the OLED to Arduino UNO A5.
ARDUINO CODE
JavaScript
#include <Arduino.h>
#include <U8g2lib.h>
#include <Wire.h> // library requires for IIC communication
U8G2_SSD1306_128X64_NONAME_F_HW_I2C u8g2(U8G2_R0, /*
reset=*/ U8X8_PIN_NONE); // initialization for the used OLED display
// images from #include <Arduino.h>
static const unsigned char image_Lock_7x8_bits[] U8X8_PROGMEM =
{0x1c,0x22,0x22,0x7f,0x7f,0x77,0x7f,0x3e};
static const unsigned char image_Bluetooth_Idle_5x8_bits[]
U8X8_PROGMEM = {0x04,0x0d,0x16,0x0c,0x0c,0x16,0x0d,0x04};
static const unsigned char image_Volup_8x6_bits[] U8X8_PROGMEM =
{0x48,0x8c,0xaf,0xaf,0x8c,0x48};
static const unsigned char image_Alert_9x8_bits[] U8X8_PROGMEM =
{0x10,0x00,0x38,0x00,0x28,0x00,0x6c,0x00,0x6c,0x00,0xfe,0x00,0xee,0
x00,0xff,0x01};
int progress = 0; // progress of the progressbar
char buffer[32]; // helper buffer to construct a string to be displayed
void setup(void) {
u8g2.begin(); // start the u8g2 library
}
void loop(void) {
u8g2.clearBuffer(); // clear the internal memory
// code from #include <Arduino.h>
u8g2.setBitmapMode(1);
u8g2.drawFrame(12, 21, 104, 20);
u8g2.drawBox(14, 23, progress, 16); // draw the progressbar fill
u8g2.setFont(u8g2_font_helvB08_tr);
sprintf(buffer, "Progress: %d%%", progress); // construct a string with the
progress variable
u8g2.drawStr(33, 53, buffer); // display the string
u8g2.setFont(u8g2_font_haxrcorp4089_tr);
u8g2.drawStr(0, 7, "Progress Bar Screen");
u8g2.drawLine(0, 9, 127, 9);
u8g2.drawXBMP( 100, 0, 7, 8, image_Lock_7x8_bits);
u8g2.drawXBMP( 111, 0, 5, 8, image_Bluetooth_Idle_5x8_bits);
u8g2.drawXBMP( 120, 1, 8, 6, image_Volup_8x6_bits);
u8g2.drawXBMP( 22, 45, 9, 8, image_Alert_9x8_bits);
u8g2.sendBuffer(); // transfer internal memory to the display
// increase the progress value to go over 0-100
progress = progress + 1;
if (progress > 100) {
progress = 0;
}
}
INSTRUCTIONS
- Connect the modules and components as per the schematic diagram.
- Upload the Arduino code into the Arduino board.
- Check th OLED shows the animation.
WORKING
- The working of Arduino OLED animations involves repeatedly clearing and redrawing the display with updated positions of text or graphics to create the effect of motion.