OBJECTIVE
To show the pressing number of the keyboard on the LCD display.
MODULES REQUIRED
- Arduino UNO
- 4X4 keypad
- LCD Display & I2C module
- Jumper wire
SCHEMATIC DIAGRAM
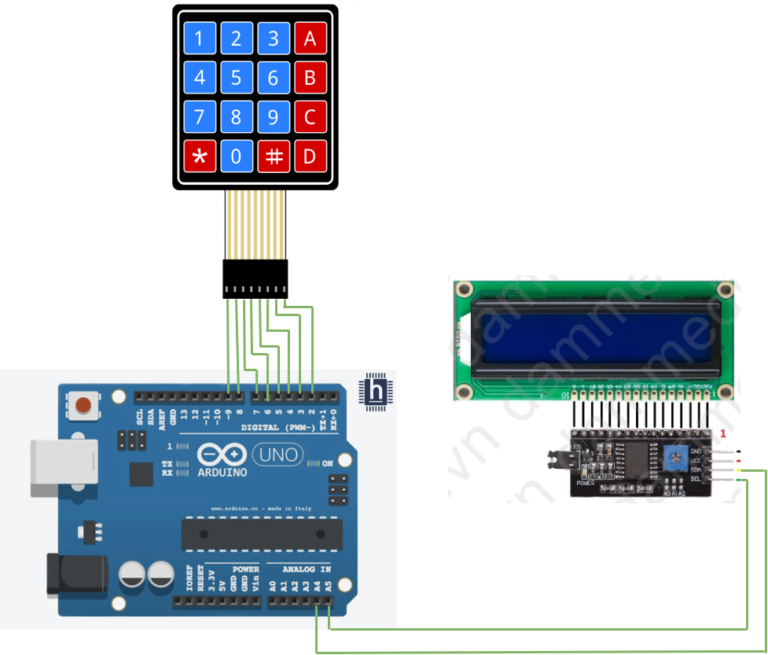
Connect I2C:
- SDA to Arduino A4
- SCL to Arduino A5
Connect Display:
- Pins 1-8 to Arduino D9-D2
ARDUINO CODE
JavaScript
#include <Keypad.h>
#include <Wire.h>
#include <LiquidCrystal_I2C.h>
const byte ROWS = 4;
const byte COLS = 4;
char hexaKeys[ROWS][COLS] = {
{'1', '2', '3', 'A'}, {'4', '5', '6', 'B'}, {'7', '8', '9', 'C'}, {'*', '0', '#', 'D'}};
byte rowPins[ROWS] = {9, 8, 7, 6};
byte colPins[COLS] = {5, 4, 3, 2};
Keypad customKeypad = Keypad(makeKeymap(hexaKeys), rowPins,
colPins, ROWS, COLS);
LiquidCrystal_I2C lcd(0x27, 16, 2);
void setup(){
// Serial.begin(9600);
lcd.backlight();
lcd.init();
lcd.clear();}
void loop(){
char customKey = customKeypad.getKey();
if (customKey){
lcd.setCursor(0, 0);
lcd.print(customKey);
// Serial.print(customKey);
}}INSTRUCTIONS
- Connect modules and components as per the schematic.
- Install Liquidcrystal_I2c and Keypad libraries.
- Upload Arduino code to the board.
- Check that the pressed key corresponds with the LCD display.
WORKING
- When a key is pressed, the Arduino reads the input and displays it on the LCD screen via the I2C interface.