OBJECTIVE
To initialize the RTC module, display time and date on an LCD, and update the clock every second.
MODULES REQUIRED
- Arduino UNO
- RTC Module
- OLED Display
- Jumper wire
SCHEMATIC DIAGRAM
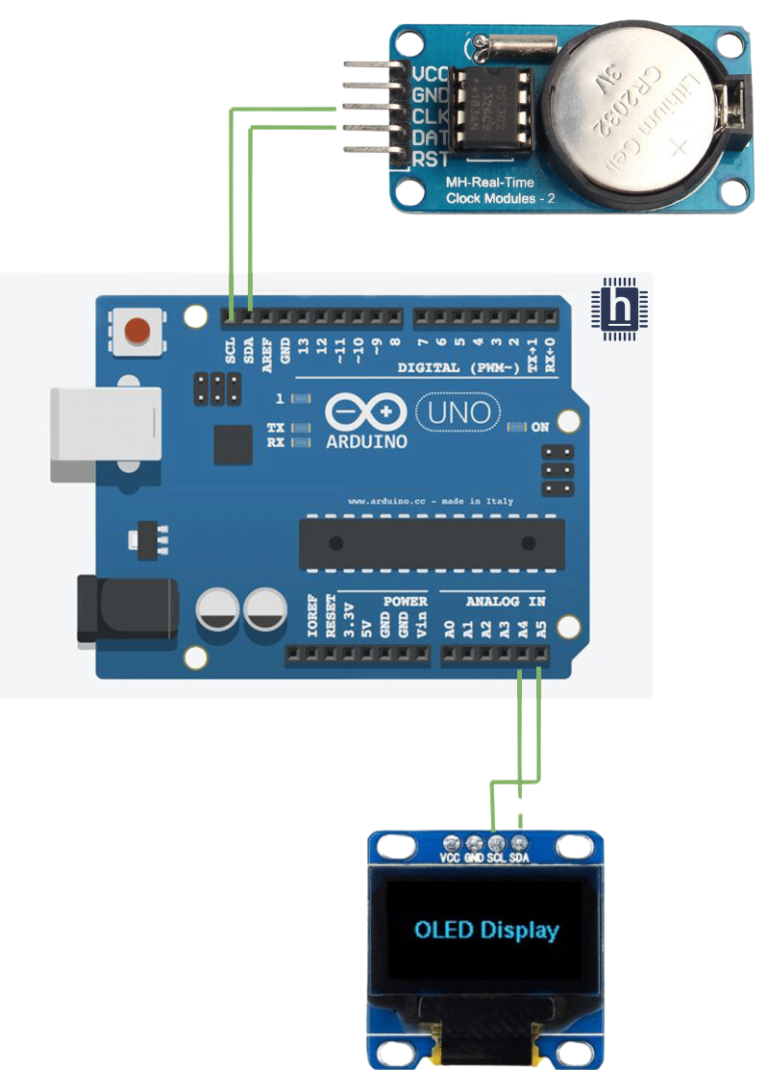
Connect Rtc Module:
- Connect the CLK pin on the RTC to Arduino pin SCL
- Connect the DAT pin on the RTC to Arduino Pin SDA
Connect OLED :
- Connect the SCL pin on the OLED Display to Arduino pin A5.
- Connect the SDA pin on the OLED Display to Arduino pin A4
ARDUINO CODE
ARDUINO CODE
C++
#include <Wire.h>
#include <Adafruit_SSD1306.h>
#include "RTClib.h"
//#include "DS1307RTC.h"
#define SCREEN_WIDTH 128 // OLED display width, in pixels
#define SCREEN_HEIGHT 64 // OLED display height, in pixels
RTC_DS1307 rtc;

char daysOfTheWeek[7][12] = {"Sunday", "Monday", "Tuesday", "Wednesday", "Thursday", "Friday", "Saturday"};

// Declaration for an SSD1306 display connected to I2C (SDA, SCL pins)
Adafruit_SSD1306 display(SCREEN_WIDTH, SCREEN_HEIGHT, &Wire, -1);
void setup ()
{
  Serial.begin(9600);
  delay(3000); // wait for console opening

 if(!display.begin(SSD1306_SWITCHCAPVCC, 0x3C)) { // Address 0x3D for 128x64
    Serial.println(F("SSD1306 allocation failed"));
    for(;;);
  }
  if (! rtc.begin()) {
    Serial.println("Couldn't find RTC");
    while (1);
  }

  // if (rtc.lostPower()) {
  //   Serial.println("RTC lost power, lets set the time!");

  // Comment out below lines once you set the date & time.
    // Following line sets the RTC to the date & time this sketch was compiled
   rtc.adjust(DateTime(F(__DATE__), F(__TIME__)));
    //rtc.adjust(DateTime(2024, 06, 15, 04, 35, 20));
    // Following line sets the RTC with an explicit date & time
    // for example to set January 27 2017 at 12:56 you would call:
    // rtc.adjust(DateTime(2017, 1, 27, 12, 56, 0));
  //}

   display.display();
 delay(2);
 display.clearDisplay();


display.clearDisplay();
display.setTextColor(WHITE);
//display.startscrollright(0x00, 0x0F);
display.setTextSize(2);
display.setCursor(0,5);
display.print("  Clock ");
display.display();
delay(3000);
}

void loop ()
{
    DateTime now = rtc.now();

    Serial.println("Current Date & Time: ");
    Serial.print(now.year(), DEC);
    Serial.print('/');
    Serial.print(now.month(), DEC);
    Serial.print('/');
    Serial.print(now.day(), DEC);
    Serial.print(" (");
    Serial.print(daysOfTheWeek[now.dayOfTheWeek()]);
    Serial.print(") ");
    Serial.print(now.hour(), DEC);
    Serial.print(':');
    Serial.print(now.minute(), DEC);
    Serial.print(':');
    Serial.print(now.second(), DEC);
    Serial.println();

    display.clearDisplay();
    display.setTextSize(2);
    display.setCursor(75,0);
    display.println(now.second(), DEC);
    display.setTextSize(2);
    display.setCursor(25,0);
    display.println(":");

    display.setTextSize(2);
    display.setCursor(65,0);
    display.println(":");

    display.setTextSize(2);
    display.setCursor(40,0);
    display.println(now.minute(), DEC);

    display.setTextSize(2);
    display.setCursor(0,0);
    display.println(now.hour(), DEC);

    display.setTextSize(2);
    display.setCursor(0,20);
    display.println(now.day(), DEC);

    display.setTextSize(2);
    display.setCursor(25,20);
    display.println("/");

    display.setTextSize(2);
    display.setCursor(40,20);
    display.println(now.month(), DEC);

    display.setTextSize(2);
    display.setCursor(55,20);
    display.println("/");

    display.setTextSize(2);
    display.setCursor(70,20);
    display.println(now.year(), DEC);

    display.setTextSize(2);
    display.setCursor(0,40);
    display.print(daysOfTheWeek[now.dayOfTheWeek()]);

    display.display();

    Serial.println();
    delay(1000);
}
INSTRUCTIONS
- Connect the modules and components as per the schematic diagram.
- Download and install Adafruit SSD1306 and RTCLib package.
- Upload the Arduino code into the Arduino board.
- Set the time on RTC, display on OLED, and update via Arduino.
WORKING
- An RTC-OLED clock with Arduino displays the current time from the RTC module on the OLED screen, updating continuously.