OBJECTIVE
Sensing the object movements and learn how PIR Sensor works.
MODULES REQUIRED
- PIR sensor
- LED
- Arduino Uno
- Jumper wire
SCHEMATIC DIAGRAM
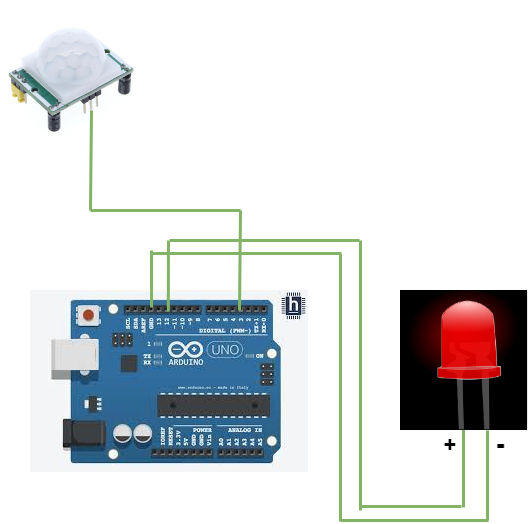
- Connect Out pin in the PIR sensor module to the pin 3 on the Arduino.
- Connect the Positive pin on the LED to Arduino pin 12
Following connection are made in inbuilt circuit, so there no need made these connection:
- Connect the Negative pin on the LED to Arduino Pin GND
ARDUINO CODE
JavaScript
int led = 12; // the pin that the LED is atteched to
int sensor = 3; // the pin that the sensor is atteched to
int state = LOW; // by default, no motion detected
int val = 0; // variable to store the sensor status (value)
void setup() {
pinMode(led, OUTPUT); // initalize LED as an output
digitalWrite(led, LOW);
pinMode(sensor, INPUT); // initialize sensor as an input
Serial.begin(9600); // initialize serial
}
void loop(){
delayMicroseconds(250);
val = digitalRead(sensor); // read sensor value
if (val == LOW) { // check if the sensor is HIGH
digitalWrite(led, LOW); // turn LED ON
delay(100); // delay 100 milliseconds
if (state == HIGH) {
Serial.println("Motion detected!");
state = HIGH; // update variable state to HIGH
//delayMicroseconds(200);
}
}
else {
digitalWrite(led, HIGH); // turn LED OFF
delay(100); // delay 200 milliseconds
if (state == HIGH){
Serial.println("Motion stopped!");
state = LOW; // update variable state to LOW
} }}INSTRUCTIONS
- Connect the modules and components as per the schematic diagram.
- Upload the Arduino code into the Arduino board.
- Test the motion detection by moving objects or hands near the sensor.
WORKING
- The PIR sensor detects the infrared radiation (heat) emitted by objects in its field of view.
- When a person or object moves, the pattern of infrared radiation changes.
- The PIR sensor detects this change and sends a signal to the microcontroller.
- The microcontroller receives the signal and triggers an alarm or turns on a light.